Fix your Windows errors automatically with FREE Advanced SystemCare app & enhance your online security.
The Tilde “~” key on your keyboard is quite a handy key used in carrying out mathematical operations or in coding to represent approximate values. It can be activated by pressing and holding Shift and the tilde (`) key simultaneously.

However, this key may stop working out of nowhere, as reported by multiple Windows 10 and Windows 11 users.
There might be various reasons for that, but most common ones are corrupted keyboard drivers, physically damaged keys, and wrong language and keyboard layout settings.
These issues can also cause other errors when you’re not able to change default keyboard language, and some driver errors can make your Bluetooth icon disappear.
So how do we fix the Windows 11 Tilde key not working issue? In this troubleshooting guide, we will reveal a few ways to get your Tilde key working again. So read on.
FIX IT QUICK: Windows 11 Tilde Key Not Working [6 Quick Fixes You Can Try Now]
If you are unable to use the Tilde key in Windows 10 or Windows 11, try executing the following solutions to fix it:
- Check if the Tilde key itself is intact.
- Update your keyboard driver.
- Use the Hardware and Devices troubleshooter.
- Press and hold Shift + Spacebar.
- Change the key sequence.
- Try using the on-screen keyboard.
Continue reading where we expand on these solutions step-by-step.
How to Fix the Windows 11 Tilde Key Not Working?
[4 Beginner-Friendly Ways]
Before we try any of the advanced solutions, let’s first explore some easy ways to make the Tilde key work.
Method 1: Check if there’s any Damage in the Tilde Key
Before you execute any of the troubleshoots mentioned below, make sure that the ‘Tilde’ key itself is not damaged. Sometimes, the keys on your keyboard can get physically damaged due to impact or dust. This prevents them from functioning properly.

Method 2: Make Sure Your Keyboard Drivers Are Updated
Another culprit behind the Tilde key not working may be outdated or faulty keyboard drivers. Make sure your keyboards have the latest version of drivers installed.
To do so:
- Type “device manager” in the search bar in the taskbar.
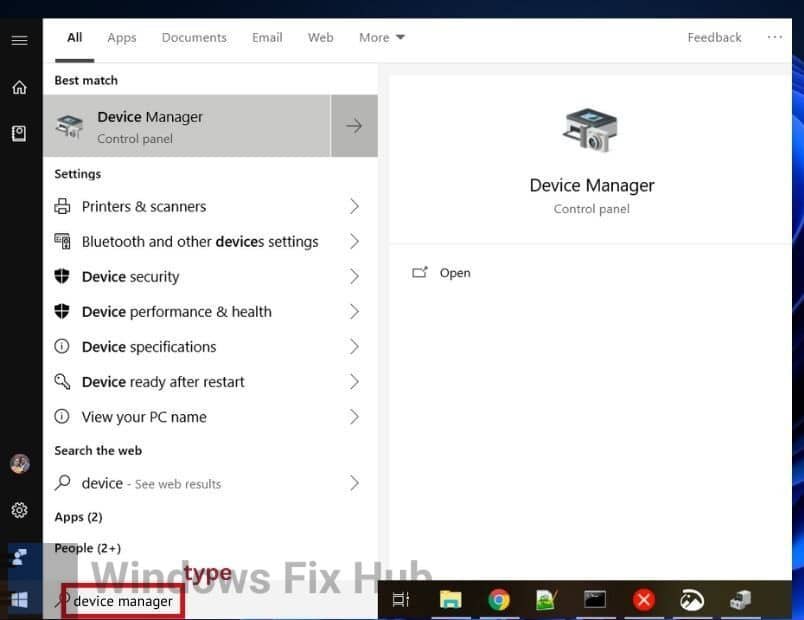
- Open “Device Manager”.
- Select the device that you want to update and double-click on it.
- Go to the “Driver” tab and select “Update Driver”.

- Follow the on-screen instructions to update your keyboard drivers.
Method 3: Run the Hardware and Devices Troubleshooter
The hardware and devices troubleshooter is a tool that automatically identifies and fixes any software issues related to the external hardware and devices. However, you can only use it if you have an external keyboard connected.
To run the Hardware and Devices troubleshooter, follow these steps:
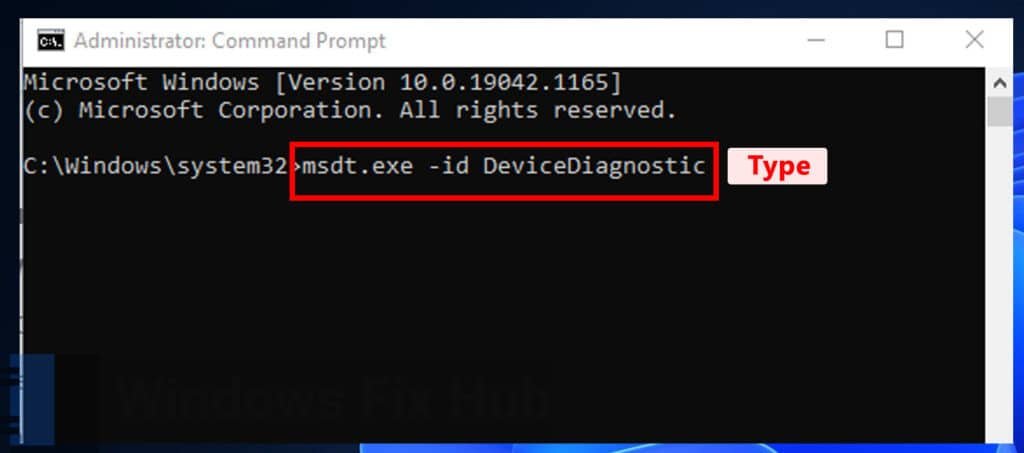
- Run “Command Prompt” as administrator.
- Enter the below command:
msdt.exe -id DeviceDiagnostic
The Hardware and Devices troubleshooter will launch.
- Now follow the onscreen instructions to identify and fix any underlying issues.
- Once done, check if the ‘Tilde’ key is working now.
Method 4: Press and Hold Shift + Spacebar and then the Tilde Key
Try pressing and holding the ‘Shift + Spacebar’ keys and then the ‘Tilde’ key. This can kind of force-run the Tilde key and resolve the problem.

How to Fix the Windows 11 Tilde Key Not Working Issue?
[2 Advanced Ways]
If you are still unable to use the Tilde key, try out these advanced methods to fix it:
Method 5: Change the Key Sequence
Another thing you can do to fix the Windows 11 Tilde Key is to change the Key Sequence settings.
Here’s how to do so:
- Press ‘Win + I’ to open “Settings“.
- Navigate to the “Time & Language” tab and select “Typing”.

- Now select “Advanced keyboard settings”.

- Click on “Language bar options”.

- Navigate to the “Advanced Key Settings” tab.
- Hit the “Change Key Sequence” button.
- Now select any other option other than “Grave Accent“ under “Switch Input Language” and “Switch Keyboard Language”.
- Press “OK”.

- Now check if the ‘Tilde’ key works.
Method 6: Try the On-Screen Keyboard
If nothing seems to work, open the “on-screen keyboard” from the ‘Start Menu’ to use the Tilde key.

We hope these fixes resolve the issue and you’re able to make the Tilde key work again.
If none of these work and you don’t have physical damage of the key — we recommend downloading the auto-fix software mentioned below which deals with 99% of Windows problems automatically.
Good luck!
iobit Advanced System Care is used by millions of users worldwide.
It’s a “must-have” for every PC or MAC user who wants:
- To fix common PC errors automatically
- To speed up their computer performance
- To fully secure their device


