Get #1 VPN for Windows & hide your online presence with Express VPN <- Try 30-days risk-free
With Windows 11 version 22H2, an internet connection has become a requirement for completing the setup of Home and Pro editions (OOBE). This change is intended to ensure that users receive the latest security updates during the installation process. Earlier versions of Windows did not have this requirement. If you’re setting up Windows 11 Home or Pro editions and encounter the “Let’s connect you to a network” screen with the “Next” button disabled, you might want to bypass this restriction for various reasons, such as limited internet access or a preference for using a local user account.
However, setting up Windows 11 without an internet connection is still possible. There are several methods to bypass this requirement. In the following section, We’ll guide you through the installation steps and methods to bypass the internet requirement. Remember to back up your data before starting, as this process will erase all information on your computer.

Install Windows 11 Without an Internet
Let’s start with the installation using the Windows USB flash drive for Windows 11. Here are the steps:
- Insert the “Windows 11 USB drive” and restart your PC.
- Press any key when prompted to begin the setup, then select “Next”.
- Click “Install now” to start the installation process.
- Enter your Windows product key. If you are reinstalling, select I don’t have a product key.
- Accept the license terms and click “Next”.
- Choose “Custom: Install Windows only (advanced)”.
- In the next window, select and delete each partition on the hard drive where you want to install Windows (typically Drive 0).
Note: Deleting partitions will remove all data from the hard drive. Avoid deleting partitions on secondary hard drives.
- Select “Drive 0” (unallocated space) for the installation and click Next.
- Wait for completion. Once the installation is finished, you will reach the out-of-the-box experience (OOBE) page. Here’s what to do next:
- Choose your region.
- Select your keyboard layout and click “Yes”. If you don’t need a secondary layout, click Skip.
At this point, you’ll arrive at the “Let’s connect to a network” or “Oops, you’ve lost your internet connection” page. To proceed without an internet connection, use one of the following methods to bypass the internet requirement:
Bypassing the Internet Requirement Windows During Setup (4 Ways)
In the methods, we will assume you have already reached the “Let’s connect to a network” screen, so we will proceed with the next steps from there.
Method 1: Use Alt and F4
A quick and simple way to bypass the internet connection screen is to use the Alt + F4 keyboard shortcut. This shortcut may close the screen and allow you to proceed. If it doesn’t work, you can try the other methods described below.
- Simply press ‘Alt + F4’ on the “Let’s connect you to the internet” screen to close this screen and move on to the next one.
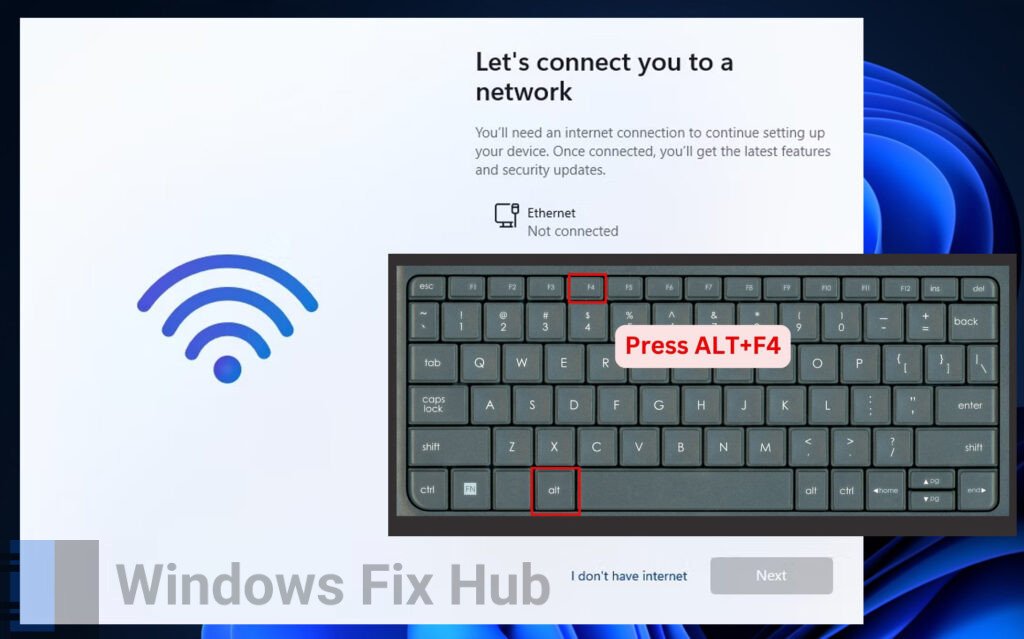
- Afterward, you can continue with the setup.
Method 2. Bypass Internet Requirement using Bypass Command
Use the Bypass command in Command Prompt to bypass the internet requirement. This command runs the bypassnro.cmd script to modify the Windows registry.
- Press ‘Shift + F10’ to open “Command Prompt”.

- Enter the below command and press ‘Enter’.
OOBE\BYPASSNRO

- Your PC will restart. Then, select “I don’t have Internet” on the “Let’s connect you to a network” screen, then click “Continue with limited setup”.

- Review and accept the “License Agreement” to proceed with setting up your local user account.
- Add security questions to help recover your local user account if you forget your password.
Method 3. End Network Connection Using Task Manager
You can also use Task Manager to end the network connection process.
- Press ‘Shift + F10’ to open “Command Prompt”.
- In the Command Prompt window, type “taskmgr” and press ‘Enter’ to launch “Task Manager”.

- Alternatively, you can use ‘Ctrl + Shift + Esc’ to open “Task Manager” directly.

- In Task Manager, click “More Details” to expand the view.
- Go to the “Processes” tab and use the search bar to locate the “Network Connection Flow” process.
- Select this process and click the “End Task” button.

- After the process terminates, close “Task Manager” and type “exit” in “Command Prompt”, then press ‘Enter’.
The installation process will refresh, and you’ll be redirected to the setup wizard. It will display a loading animation before moving to the next step. Here, enter your name and password to create a local user account and complete the setup.
Method 4. End Network Connection Using Command Prompt
Finally, use Command Prompt to end the network connection.
- Press ‘Shift + F10’ to open “Command Prompt”.
- Enter the following command and hit ‘Enter’:
taskkill /F /IM oobenetworkconnectionflow.exe

- Exit the “Command Prompt” and continue the setup.
If one of the methods successfully completes your setup, connect your PC to the internet once the setup is finished. Then, go to Settings > Windows Update to download important security and feature updates. You may notice some missing icons initially, but these will be automatically downloaded when your PC connects to the internet.
If you run into any issues or need further assistance, please leave a comment below, and we’ll be glad to offer additional fixes or alternative solutions.
ExpressVPN is a top-notch virtual private network used by millions of people worldwide.
It’s a “must-have” for every PC or MAC user who cares about their online privacy & security:
- It blocks annoying and malicious ads;
- Stops viruses during online downloads;
- It hides your identity from hackers, trackers, and even the Government!
- Unblocks GEO-restricted content.


