Fix your Windows update errors automatically with FREE Advanced SystemCare app & enhance your online security.
Have you recently tried updating your Windows system and encountered and error with a code 0xC190010A? A lot of people have…
New updates are notified to users, and the system offers simple methods to execute this sensitive procedure.
Although, these particular errors (0XC190010d and 0XC190010a) often are caused by manual updating and invalid command line arguments during Windows upgrades. You may solve these problems by following our comprehensive guide where our experts provided you with several different options to solve it.
Users who see this error usually report issues with 0x80240022, KB5035853, and 0x800b0110 updates.
As well as, an interface error 0x80040155 and Windows update service disruptions.
Dealing with these errors might be annoying, there are numerous options that you can attempt to repair.
Let’s take a look at them together.

1. Verify that you are Passing the Right Parameters to the Command Line
There must be a problem with the parameters you used if the 0XC190010a or 0XC190010d error codes appear during the Windows upgrade deployment utilizing command-line options. Installing or migrating with the wrong command-line options will result in these issues. To help you check or verify anything, we provide you with a list of arguments from the Microsoft website.

NOTE: This step is only for those who are doing an upgrade via CMD and get one of the following error messages:
- 0XC190010d MOSETUP_E_INVALID_CMD_LINE
The installation process was launched with an invalid command-line argument. - 0XC190010a MOSETUP_E_UNKNOWN_CMD_LINE
The installation process was launched with an unknown command-line argument.
2. Launch the Troubleshooter for Windows Update
Some errors and inappropriate utility activities may be handled using Windows’ built-in troubleshooters. To identify and resolve the problems that are detected, you have the option to run the Windows Update troubleshooter.
- First, launch ‘Windows Settings’ by pressing ‘Win + I’.
- The second step is to go to the “Troubleshoot” tab after selecting “Update & Security”.
- In the next step, choose “Additional Troubleshooters”. In the window that follows, you will see “Windows Update”. To launch the troubleshooter, click on it.

As soon as issues arise, the computer will begin to flag them automatically. The on-screen instructions will guide you through the process.
3. Run System File Checker
Your next step could be to launch a file checker for your system. This utility scans for and fixes damaged or missing system files. Keep these procedures in mind to conducting a system file checker:
- Open “Command Prompt (Admin)” by pressing ‘Windows key + X’.
- After that, hit ‘Enter’ after entering
sfc /scannow - Give the program a chance to finish scanning and fixing any problems it finds.

If the fault persists after running the system file checker, a memory diagnostic may be worth a try. A BSOD error, such as 0xC190010A, might be caused by defective RAM. This is how to do a memory diagnostic:
- Launch “Run” by pressing the ‘Windows key + R’. Then, enter “mdsched.exe” (raw, unquoted).

- After that, choose “Restart now and check for problems” and hit ‘Enter’.

4. Make Sure There’s Enough Space on the Disc
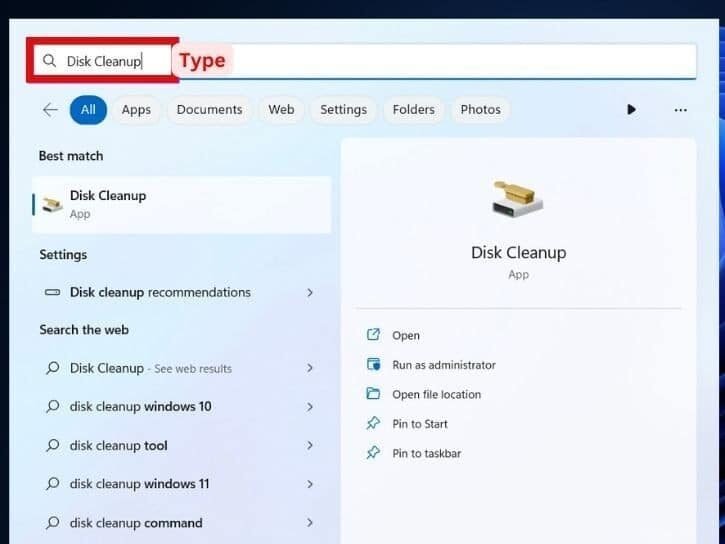
One possible cause of the updates not installing is a lack of space. To free up space, run Disk Cleanup as follows:
- Press ‘Enter’ after typing “Disk Cleanup” into the ‘Windows search bar’.
- “Drive C” should already be selected, so just choose it and hit “OK” if that’s where Windows is installed.
- Press the “Clean up system files” button.
- Click “OK” after re-selecting your primary disc.

- Choose the most utilized data here. This usually includes things like Windows Update, Temporary Internet Files, the Recycle Bin, Delivery Optimization Files, and a few more.
- The procedure should conclude soon after you click ‘OK’.
5. Update to the Most Recent Windows Version by Installing it Manually
You also have the option to apply the most recent cumulative update manually if you encounter the problem 0xc190010a or 0xc190010d during the installation process. If you want to update your computer manually, here’s how to do that.
- Visit the page that displays the Windows 10 update history.

- Choose the version that is currently installed on your PC.
- Then, go to the “In this Release” area and click on the first link.
- Start the cumulative update number with a beginning “KB” and copy it.

- The next step is to get the CU number from “Microsoft’s Update Catalog“ by pasting it into the search field.
- Click the “Download” button when you’ve selected the update that corresponds to your device’s architecture.

- Then, to begin downloading the most recent security, non-security, or optional update, select the first result.

- Once the download is finished, open the folder where the file is located and double-click the setup.
Thats’ all!
If these steps don’t resolve the issue, reinstalling Windows or restoring your machine may be necessary. Make a copy of all of your crucial files and data before you proceed.
You might also want to consider using iobit Advanced System Care to fix the issues automatically.
Dealing with errors 0xC190010A and 0xC190010B may be rather annoying, but as you can see it can definitely be fixed in a few different ways.
iobit Advanced System Care is used by millions of users worldwide.
It’s a “must-have” for every PC or MAC user who wants:
- To fix common PC errors automatically
- To speed up their computer performance
- To fully secure their device


