Fix internet glitches & all your PC errors with FREE Advanced SystemCare app & enhance your online security.
Live Caption is a helpful feature presented by Google Chrome that automatically transcribes any audio or video playing in your browser and shows the captions on-screen.
It’s super handy if you’re in a noisy place and don’t have your headphones, have trouble hearing, or just prefer reading along. However, some users may prefer to disable live captions due to personal preference, finding them distracting or unnecessary, or if the captions clutter the screen, particularly on smaller devices.
Whether you want to disable or enable the Live Caption feature, we’ve got you covered. In this guide, we’ll learn how to customize, enable, and disable Live Caption in Google Chrome and tailor your browsing experience to your preferences.
Another useful trick — set or restore your homepage on Chrome or any other browser.
And if you like less loaded Windows, learn how to remove the ‘Recommended’ section from your start menu.
DO IT NOW: Quick Overview of the Guide
Here’s a quick overview of the topics covered in the article. You can jump straight to the interesting topic:
- Enabling Live Captions in Google Chrome:
– Method 1: Using Chrome Settings
– Method 2: Using Chrome’s Media Playback Control Button - Disabling Live Captions in Google Chrome:
– Method 1. Using Chrome Settings
– Method 2. Using Chrome’s Media Playback Control Button - How to Customize Live Captions
Enabling Live Captions in Google Chrome
There are two ways to turn on live captions, and we’ll explain both below. Choose whichever method feels simpler to you.
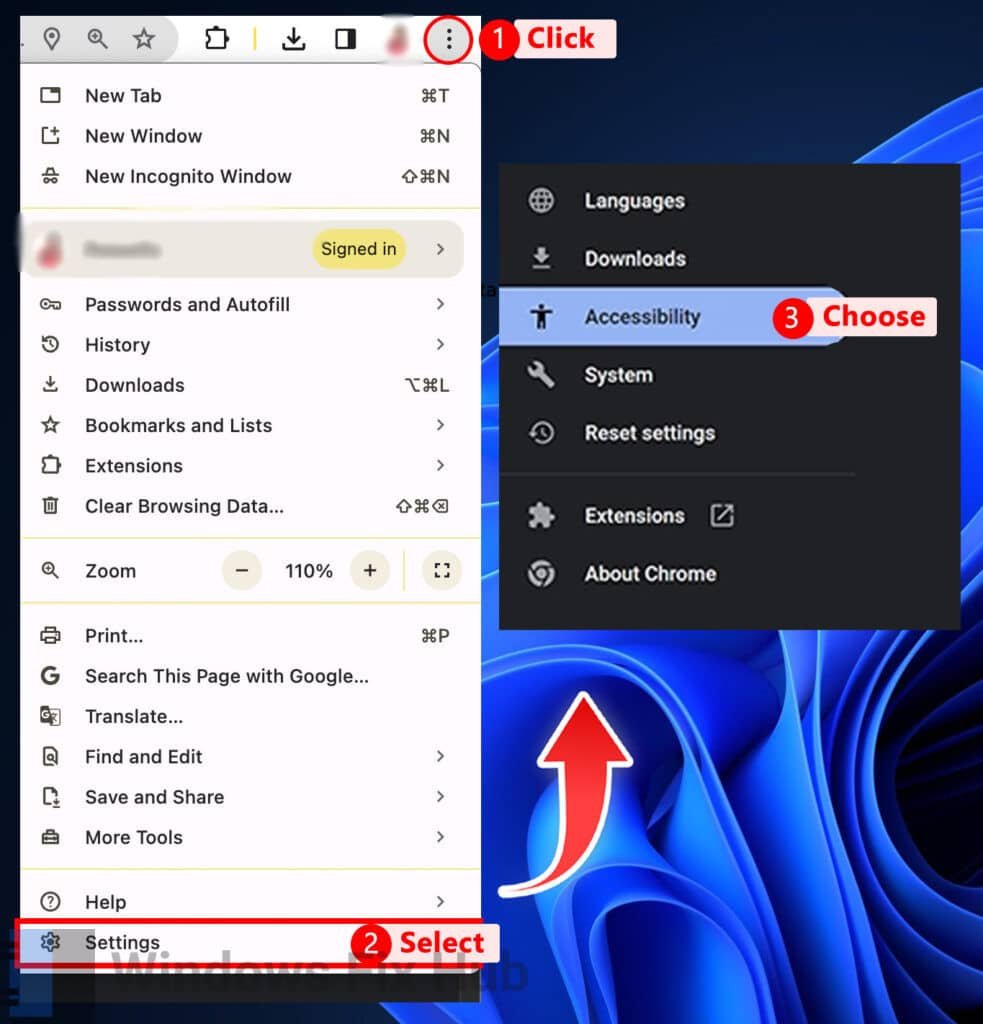
Method 1: Using Chrome Settings
- Open “Google Chrome”.
- Click on the three dots in the top right corner, then pick “Settings”.
- On the left side, click on “Accessibility”.
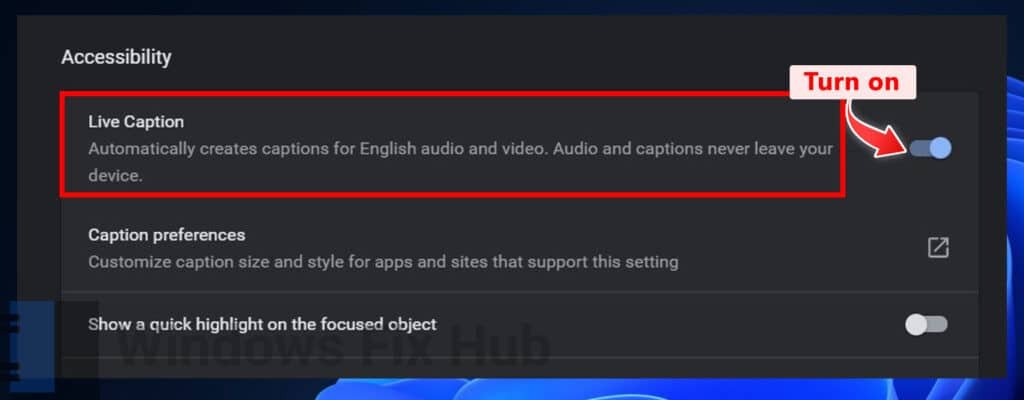
- Turn on the switch for “Live Caption”.
- Close “Chrome” and open it again. Then, play a video online to see the captions.
Method 2: Using Chrome’s Media Playback Control Button
When you’re watching a video or listening to music, a little control panel shows up near the address bar, you can turn captions on using that. Here’s what to do:
- Start playing a video or audio in “Chrome”.
- You’ll see a small icon for media controls.
- Click on that icon.
- Turn on the switch for “Live Captions”.
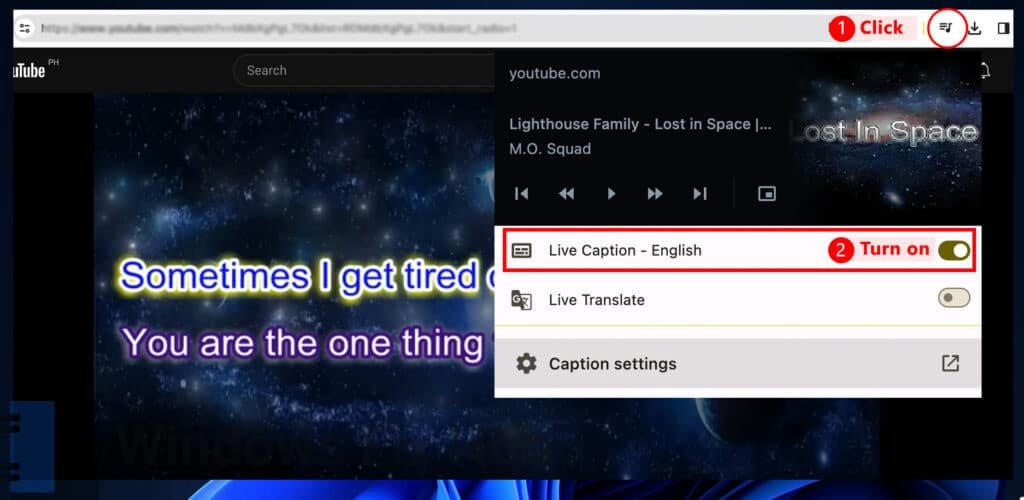
If it’s your first time using this feature, it might download some language files before it starts working.
Disabling Live Captions in Google Chrome
Similar to ‘Enabling’, you can turn off Live Caption in two ways. The first way involves changing settings in Chrome, the second way lets you turn off Live Caption using Chrome’s Media Playback Control button. Both ways to turn off Live Caption are explained below.
Method 1: Using Chrome Settings
Follow these steps to turn off Live Caption in Chrome Settings:
- Open “Chrome”.
- Click on the three dots in the top-right corner.
- Choose “Settings” from the menu.
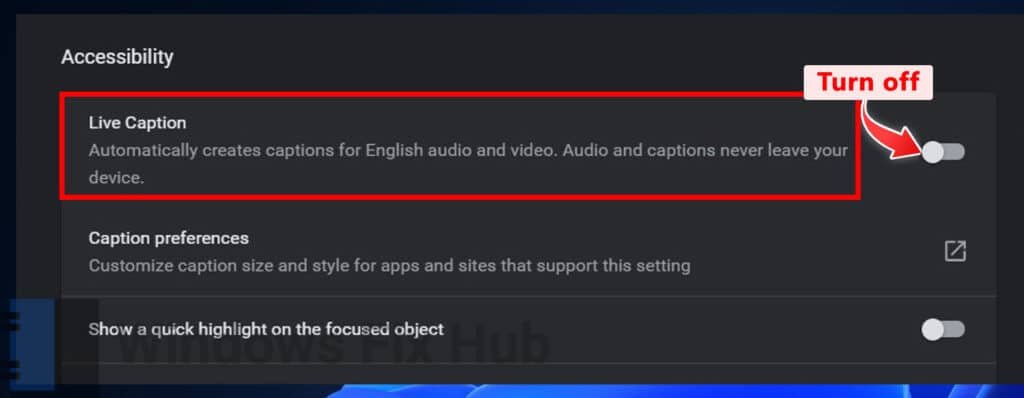
- On the left side, go to the “Accessibility” tab.

- Turn off the switch next to “Live Caption”.
Method 2: Using Chrome’s Media Playback Control Button
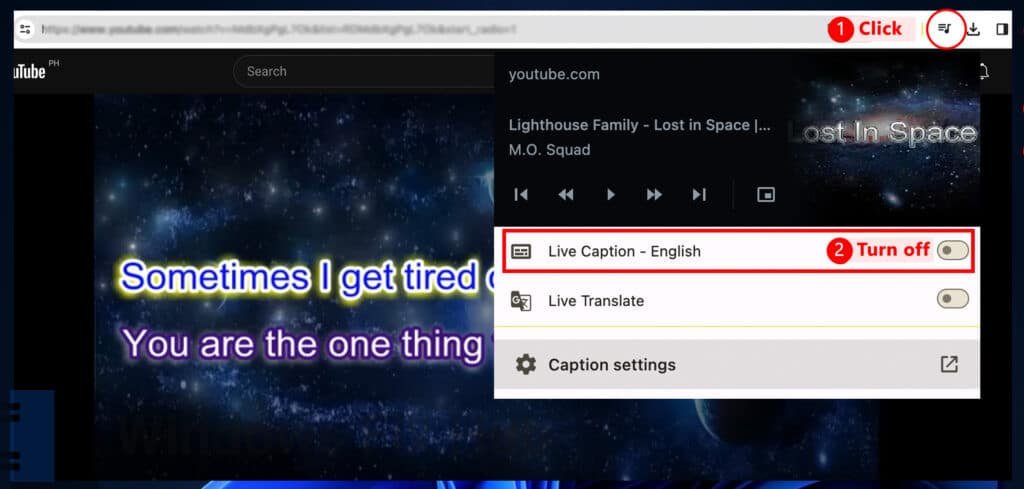
To turn off Live Caption using Chrome’s Media Playback Control button, follow these steps:
- Play audio or video in your browser.
- Click on the ‘Media Playback Control’ icon, which looks like three lines with a music note next to them.
- Turn off the switch next to “Live Caption”.
How to Customize Live Captions
Customizing live captions in Google Chrome is easy and lets you make them fit your needs. You can change how they look, like the size, style, and color of the text, to make them easier to read and match your browsing style. You can also pick the language you want the captions in, though right now, it only works for a few languages, but more are being added. By default, the captions show up at the bottom of your screen in plain white text with a black background, but you can change that too. Here’s how:
- To move the captions to a different spot on your screen, just click and drag them where you want.
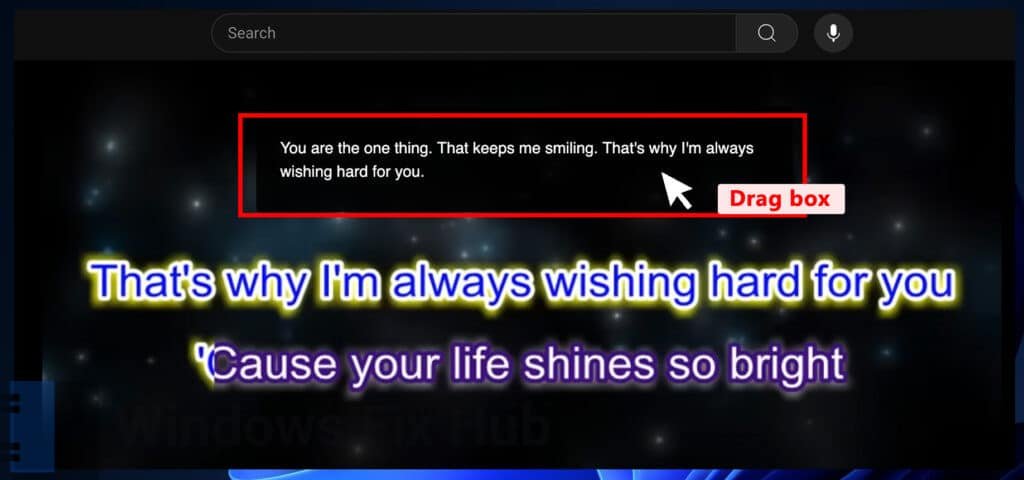
- You can also make the captions bigger by clicking on the downward arrow, so you can see more lines at once.
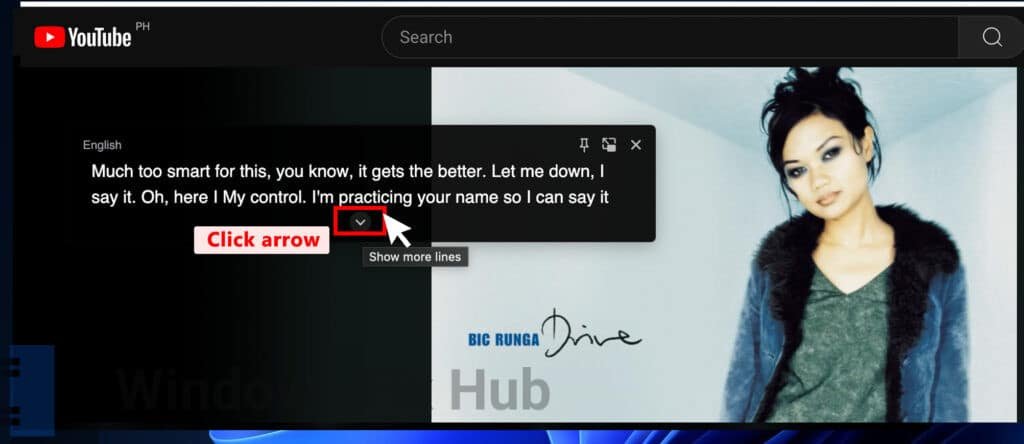
If you want, you can change the color, transparency, style, and effects of the captions. Here’s how to do it:
- Open “Google Chrome“.
- Click on the three dots in the top-right corner and choose “Settings”.

- Navigate to “Accessibility” and then select “Captions Preferences”.
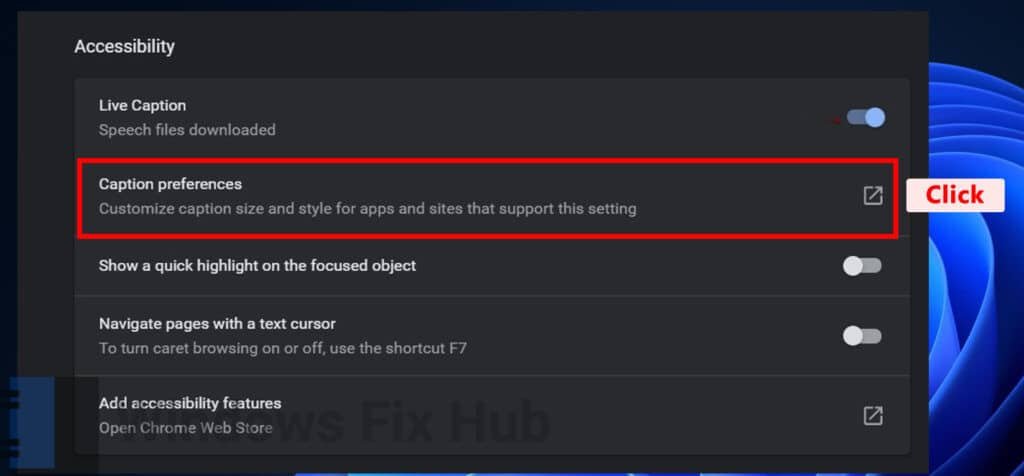
- Here, you can customize how the captions look to make them just right for you. You can even change the background color and transparency of the captions to make them easier to see against the rest of your screen.
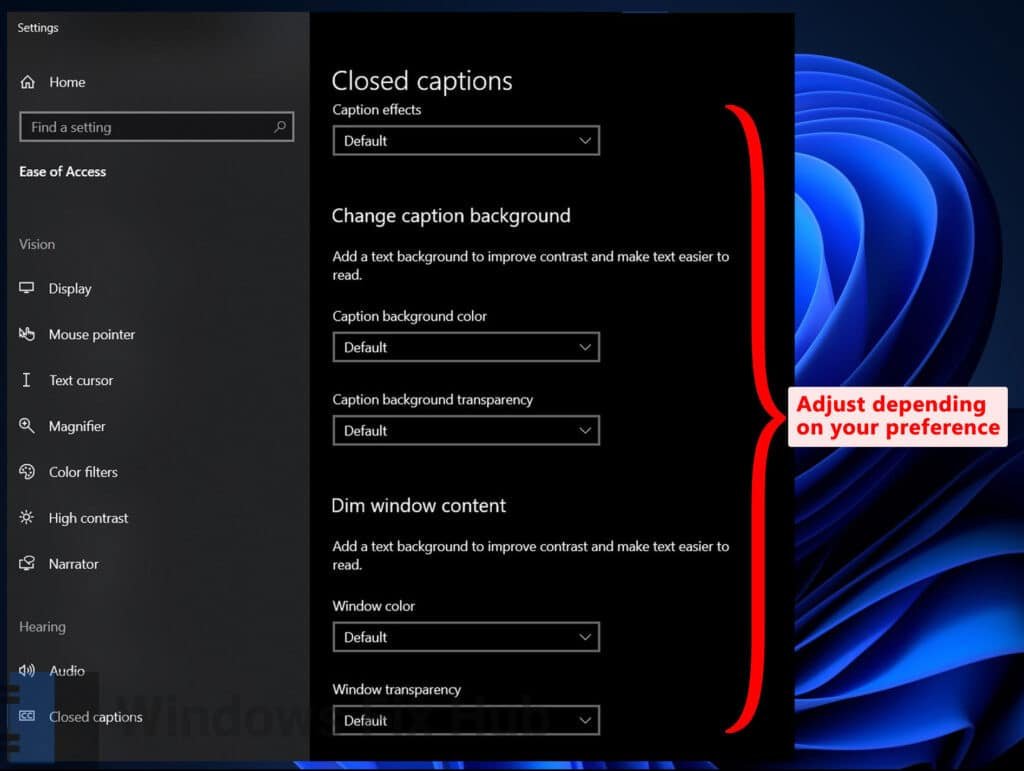
- Once you’ve made your changes, you’ll need to turn them off and then turn them back on for them to update.
Final Thoughts
And that’s all, it’s that easy. Overall, Live Caption is a handy feature that can make browsing the web more accessible and enjoyable for everyone. Whether you prefer having captions or not, enabling and disabling Live Caption in Google Chrome is quite easy to do. I hope you found this article useful, if you did – share it with your friends!
iobit Advanced System Care is used by millions of users worldwide.
It’s a “must-have” for every PC or MAC user who wants:
- To fix common PC errors automatically
- To speed up their computer performance
- To fully secure their device


